Comment! Follow! Subscribe!

Comment! Follow! Subscribe!

Friday, May 27, 2011

Cute and Sassy Headband Tutorial!! (Great for all hair lengths!)

This is really easy to make and there was absolutely NO sewing involved!

I like this headband because it has a wire running through it. That makes it adjustable and it will stay on your head all day!
Here's how it's done!

WHAT YOU'LL NEED (more or less):

- one fourth of a yard of fabric (the softer the better)
- one yard of coated wire (the wire should be able to bend and hold its shape)
- ruler 
-scissors
- fabric glue (because I cant really sew)
*pins are optional

LETS DO THIS:
Step one:

Fold your fabric in half. Hot dog style :)

Step two:
Iron the bottom edge. This is kinda sorta optional but I think it helps! (AlsoOoo, if you don't have an iron use a hair straightener... thats what I did!)

Step three:
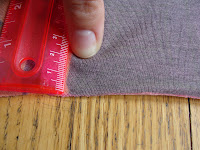
Unfold the fabric so the patterned side is face up! Measure about 2 cm from the edge and make a line of fabric glue all along that edge. 

Step four:

Fold the fabric in half! Go do something else for 10 minutes while it dries. 

Step five:

 Scrunchhh the fabric up using your finger. 


 When you get to the other end of the fabric pull it through....

Now, you should have a seam.... and you didn't even have to pick up a needle. 

Step six:

Take the wire and straighten it out!

The wire is going to run along the seam! BUT NOT YET!

choose one side of the seam then measure about 1 1/2 cm from the edge of the fabric. Then make another line of glue.
Then stick the two sides together! Creating another seam!

Step seven:

When its dry, find the hole in between the two seams!
Then...

Run the wire through!

It should look something like this when the wire is inside of it.

Step eight:

Trim off the extra fabric on the end but leave about an inch on each side.

Step nine:

Glue the edges together on both ends of the fabric.


AND YOU NOW HAVE A HEAD BAND!


Yay!


I like to put in on my head and then twist/scrunch the ends together to make a flowery thingy! 


<3


Wednesday, May 25, 2011

9 Things to do When You are NOT Feeling Fabulous...

Sometimes when you're in a bad mood (for whatever reason,) you need something to make your day a little brighter... 

Here is a list of 9 things I like to do when I feel like poop:

1. Wear SEXY Undies. yea.. undies. 

No matter what size we actually are, we all feel FAT and GROSS some days. Wearing sexy undies can help to remind you that you are hot... even if you are the only one that gets to enjoy the view. 

2. Light a Candle that Smells GOOOOD.

If your nose is happy... so are you. 
p.s. dont start a fire.... that will only make your day worse. 

3. WORKOUT!

I HATE going to the gym. But once I am all done with my workout I feel GREAT! Even if you can only do a little...
PUMP THAT IRON 

4. Clean Your Space Up.  

I cannot tell you how many times I have sat like a LOSER in my DISASTER of a room feeling like shit, not knowing what to do or how to entertain my self.  But then I would get the brite idea to tidy up and BAM! I just felt good... I dont know why this one works... it just does! 

5. ICE CREAM 

Someone once told me that the only two men in my life should be Ben&Jerry. If your feelin' heart achy.... these guys can help! 

6. Take a shower...

wash your hair, leave the conditioner in EXTRA long, exfoliate, shave, and even swab out your ears if you need to... you'll feel right as rain.

7. Paint those piggies!

Makes ya feel like a champ.

8. Sttttrrrrreeeeeeetttcccchhhh 

Even if you think you're bad at yoga (like me) .... use google to look up easy poses and just do a few. 

9. THE GOLDEN RULE...
look how happy they are!
My mom always says to me, "When the going gets tough, the tough go shopping." 

So, there you have it! 


Sunday, May 8, 2011

To The Nines: NINE Things I LOVE for SPRING!

SO! Spring is here! The following is a list of 9 fashion trends that I think are DA BOMB!! 

First up on the list:

Rust and Burnt Orange clothing/accessories:
I have no idea why I am so attracted to this right now but I do know that I absolutely LOOOVE it. I think its great because it's a way to add INTENSE color to your wardrobe even if you usually don't like to rock bright colors. What I really want.... is a blazer in this color. AND SPEAKING OF BLAZERS....

NUMBER 2:

The Boy Friend Blazer
I have been really into these lately. BF blazers are an awesome way to class up your shit. 'Nuf Said. 

Number 3:

ADORABLE platform sandals. 
These are Big Buddha 'Zig' sandals. I LOVE them! (I own a pair.) They are tall but you can definitely still walk in them comfortably. BUT THE BEST PART IS... they are under 60 bucks! Work them with some skinny jeans or a pair of shorts to make you legs look HAWT. I love LOVE LoVe, THESE SHOES!

Number 4:
MAXI SKIRTS

Being 5'9",  I feel like I (and other tall ladies) should really use this trend to our advantage. Its a way to get a lot of pattern and color in an outfit without looking like your drowning in it. 

Number 5:
Crop Top

Now, crop tops are not for everyone. I certainly understand not wanting to reveal you tummy to the world. However, I think a crop top can be cute without being scant. You can layer it with a tank or pair it with something high waisted on the bottom. 

Number 6:
I Adore-a a good Fedora 
I dont usually agree with hats. The only time I will ever wear one is in the winter. BUT with fedoras... I don't know, they're just cool looking. I HIGHLY RECOMMEND THAT YOU WEAR ONE.

Number 7:
Aviators
Just like fedoras, these are just cool. You gotta love looking like a cop. 

Number 8:
Stack them Bracelets Ladies


I see this everywhere (including my own wrists.) I just think its cute. Also, a great way to show off every  bracelet you own at once. SOOO consider that. 

ANNNND NUMERO 9:
The Small Saddle Bag
 Being a humongous bag person, I was very much against this trend when it got popular. But, over time, as I saw it more and more, It just grew on me. AND NOW I LOVE THEM. Having a little bag is great for many reasons. For one thing, it's like a big wallet that you can just take with you anywhere... And secondly, wearing the usually skinny strap across your body can be a great way to make you look longer and thinner. So there's that. 


And there you have it boys and girls! My top 9  fashion trends for spring. I hope this has been both a touching and informative experience for you. 

Keep it sexy people. 


Thursday, May 5, 2011

Cute but Edgy Zipper Bracelet Tutorial!

 
A while ago I saw a cute zippered bracelet for sale online. Of course it was a BAJILLION DOLLARS. so I thought I would just try to make my own. It was EASY and only cost about 8 bucks! So, below are the instructions to make one for your self. 

What You Will Need (more or less)

-One zipper (found at most craft/sewing stores and can be any length but I would stick to about 7inches)
-Around 8 connector rings (can be the same or different size. Its also best to have them match the color of the zipper.)
-One lobster claw jewelry closure (also best when it matches the zipper)
-Needle and thread that is the same color as zipper fabric (I used black)
-A lighter (WARNING: FIRE IS DANGEROUS AND HURTS LIKE A BITCH! BE CAREFUL... If you need an adult, find one.)
-Scissors (the sharper the better)

LETS GET READY TO RUMBLE!
step one:
Cut the extra fabric off both ends of the zipper. 

Step two:

Cut down the fabric of the zipper on each side. This will roughly determine the width of your bracelet. It's OK if its messy... we are about to fix that. 

Step three:
Again... FIRE IS HOT. BE CAREFUL.
This part can be tricky. You now have to burn the edges of the zipper fabric. The reason being that the fabric will fray if it doesn't get sealed some how. Hence the flames. You really don't even have to touch the flame to the fabric just get it close enough that the fibers start to melt. Then run it up and down the length of the zipper. Repeat on the other side. Make sure you get the ends too! It should end up a little something like this:

Step four:
You're going to sew the two smaller connector circle thingies to the end of the zipper that DOES NOT have the zipper pull.
Like sew... (hahah) 

Step five
Reaaaalll easy:
Take the bigger connecter from before, and connect it to the two smaller ones. 
THEN... And this is optional, add more connectors! 

Step six:
Add the lobster claw to the end!
AND YOU NOW HAVE A BRACELET. 


ENJOY!